Our Razor Dune Buggy is finished now. Here is a quick video showing it off with the new parts:
List of changed components from the original configuration:
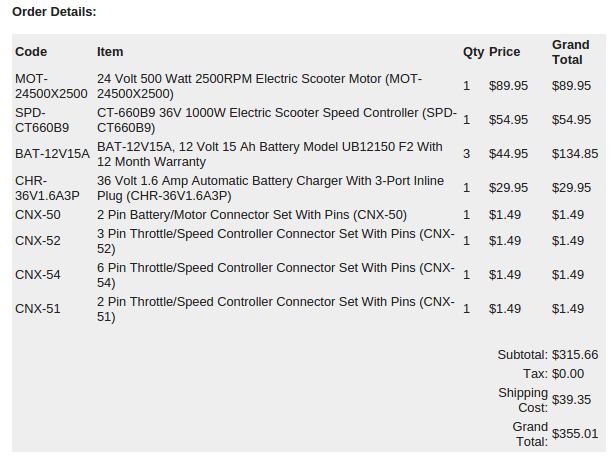
Here is a list of parts I ordered from ElectricScooterParts.com:

Added components:
- Stop push button w/ key reset and housing
- 36v state of charge gauge
- Cheap plastic gauge pod
- Battery disconnect switch
Bryson says it is fast:
The first ride on the dune buggy:
Good for doing donuts:


Did you have to modify the motor to mount it?
no, but I couldn’t use the old motor mount.
I used 2 pieces of all-thread, bent around the motor and run through holes in the buggy frame.
How easy was it to connect the cables between the controller and the battery, motor? That is the part which scares me the most. Do you have any diagrams to share?
yes, it was pretty easy. the place I bought the parts from had a wiring diagram, and had all the connectors too
How did you mount your motor in place? Can you let me know where you got the mounting part from?
Henry, I just used two pieces of allthread (3/16″ I think) that I bent into the shape of “U”s. I used the existing bottom plate, and drilled new holes for the allthread to penetrate the bottom. Simple and cheap.
I just replied to your youtube video. That is a very nice and super clean install…I really like what you’ve done!!
I’m going to be buying one for my kids for Christmas and wanted to get the parts ready to do the 36V upgrade. I have a question regarding the battery spade connectors and wiring. Are those factory? If not do you happen to know what gauge wire you used and where you got the spade connectors from? I saw you used a piggy back spade connector on the battery below the steering and I wanted to use that too to add some LEDs and the volt gauge.
I think I used 10ga wire. I had the spade connectors on hand, but they are available at autoparts stores and home improvement stores. I’ve had problems with the connectors, they loosen up over time, I have to rebend them to get them tight again.